Wednesday 31 August 2016

Very Cool Crackle paint technique MMM#27 #Mixed Media Morsels


Hello my friends!  I also belong to a FB group called Mixed Media Morsels created by Cat Hand.  Some of you that may have been following along for a while, may have seen some other "morsels"  I have participated in.  Sometimes I spread myself a little thin, consequently, there are a lot of morsels that I have yet to do.  But this technique intrigued me, so I made a point of doing it.  I have used crackle pasres before, but I did this with plain old Elmer's glue!  Not bad!  Here is a link to Cat's video that inspired me to try this.  Mixed Media Morsel #27  She is using a crackle medium, but mentions that the same can be accomplished with glue.

First I inked my background using Tim Holtz distress inks so that it would be darker through the cracks.


I have found that you can create an interesting background by rubbing your paper or card over the ink pads after blending your initial background.  Although, you won't see much of this using the crackle technique!

After I had inked my card, I applied a decent coat of glue (I used Elmer's, I'm sure others would work, but it probably should be white school glue")


I let it dry for about 15 minutes, which seemed to be just about the perfect timing. Then I added a coat of acrylic craft paint.  According to some of the posts on Mixed Media Morsels, the timing is important, too soon or too late and you don't get a good crackle effect.  I guess I was lucky with my first attempt,  so I don't know first-hand what happens with a different timing


The one in the top right corner had an almost instant effect!  The other two that I did took a little longer, but not much.  You can see results quickly, but let it dry thoroughly before trying to work with it.


Thanks for stopping by to have a look at this technique and a big thanks to Cat Hand for sharing it.. I hope you think it's as cool as I do!  I will be creating some tags with these backgrounds, but I was so excited that it worked so well, that I wanted to share right away!  There are many people that would not understand why this would excite me, but I'm sure most of you do, lol!
Hope you give it a try and have some fun.  Have an awesome and artful day, my friends!

Craft Haul! Things that I didn't expect to find at the dollar store.


Hello my friends.  Today I am doing something a little different than I normally post.  I don't usually do hauls.  I did do one with my goodies from Florida, but as a general rule, it's not something I normally dot.  I have always found handy things in the craft aisle at the dollar store, but occasionally there are some little unexpected gems.  All of the items in this post, with the exception of the stamp sets,  were purchased at Dollarama..  First let me clarify one thing.  Not everything in Dollarama is $1.  In fact, most things are not anymore.  At first they jumped up to $2, then $3 and now items range up to $4.  That being said, sometimes $4 is still a good deal.  I find a lot of things that I can use, but what I don't usually find are brand-name products.  It is a hit and miss thing.  When there's something good on the shelves, they don't usually last long.  Not all stores seem to have the same things  I imagine these are probably discontinued items, but that doesn't bother me at all.  I did not get all of these things at the same time or at the same location, but I wanted to share the things that  I ave found so that if they are the kind of things you are interested in, you can keep an eyes open for them the next time you are in your local Dollarama,  if you have one where you live.  There are a few items that I am also going to show you that came from an independent dollar store near my friend's cottage that I also considered a good find..  As we all know, crafting can be an expensive hobby, so it's always nice to find  a good bargain and still fell that we got a quality product! Maybe your local dollar store will have some nice surprises sometimes.


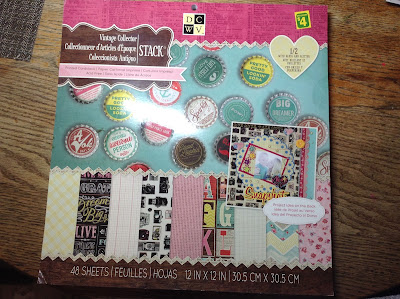
These are full sized, 12" x 12" cardstock  pads(not light paper)..  Some sheets are embossed and all of the sheets in the Glitter pack have some glitter on them.  There were some nice and interesting pages in them.  $4 each.  I felt that they were a great deal.  Especially considering that the regular price at Michaels (which I NEVER pay!) is $29.99 for similar paper stacks from the same company.


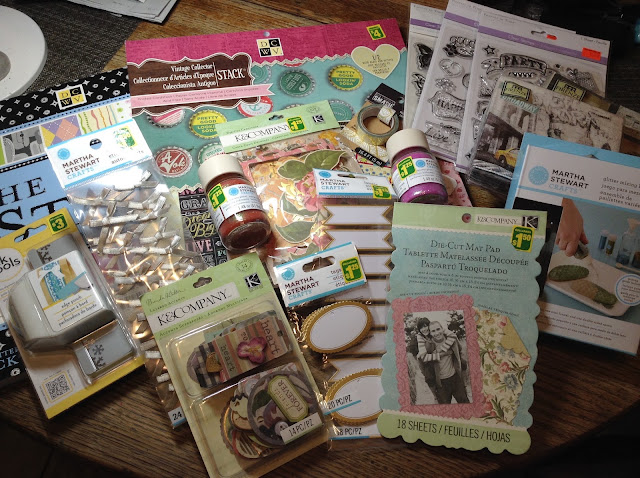
These were very pretty vintage style  die cut heavy papers.  They are all printed 2 sides.


Recently, I have been seeing a few different Martha Stewart products available in Dollarama.  The glitter is irredescent and very pretty.  Something that I can't capture in a photo.


Some K & Company embellishments and ephemera for $1.


I was very surprised to find some EK Success punches for $3 each.  These were found at different locations.   The large punch with the stars is a 2-step punch.


I have had these paper pads for a while, every once in a while I would see them  at Dollarama and grab them.

I particularly like this paper pad and I have made several cards with it.  I have to confess, at $2 each, I have a few in my stash!  To be truthful, I have at least a couple of each paper pad and stack that I really like.  I'm sure these are all older products, but I am making cards and tags, not promoting products, so it doesn't matter to me if they are out-dated as long as I like them.


Now these stamp sets were not  purchased at Dollarama.  They were bought at an independent dollar store near my friends cottage.  Lynn called me up and told me that they had these cute stamp sets and asked me if I wanted her to grab them for me. The price was $1.85 each. !!! Granted they are not top quality, but they aren't bad clear cling stamps.  There are several in each set and many that I will find useful.  Those of you that are stampers know how expensive some stamp sets can be.  Great find, Lynn!  There were some other things that Lynn picked up for me as well, but I wanted to share the stamps.

There are several other items that I get from the dollar stores.  I find a lot in the craft aisle at the DollarTree as well.  There are glitter paper, metallic  cardstock, adhesives,  small paper pads, embellishments and more.  Another thing that I keep my eyes open for  are some cool paper napkins that I like to use as backgrounds and collage elements.  It's a great technique, here are a few examples if you are interested "From London to Paris tag"  Elegance tag"  "Bonne fete tag"
 There are a lot of regular products usually found in these stores.  But I wanted to show you a few of the little gems that aren't usually found, not in the stores where I live at least.  So have a look around your local dollar store and perhaps you too can find some little treasures and get more out of your crafting budget.  Sometimes finding these little goodies are almost as fun as using them!

Thanks so much for joining me!  I hope you are as lucky at your local dollar store  as I have been at mine.  Actually, a thought went through my head as I was doing this post.  I think that I will challenge myself to make a couple of tags just using dollar store items.  So stay tuned for those!
Have an awesome and artful day, my friends!

Saturday 27 August 2016

Another "Merry Christmas" tag Tag # 5-25 #onelittletag


Hello again my friends!  This is my Christmas tag for May.   This catches me up, although honestly, I am enjoying making these Christmas tags.  I have a lot of stuff in my Christmas stash to use up, so I may just keep making them for a bit.
For this tag, I used a Tim Holtz stencil to create the brick background.  I used Barn Door Red and Vintage Photo distress ink.


The door was from my stash, cut using a Tim Holtz die.  It was cut from Recollections shimmer card.  I edged the door with distress ink.  I die cut my sentiment from a new  Yvonne Creations die I recently got.

The wreath and bow were from my stash, also cut from a Tim Holtz Movers and Shapers  die. I alsoe edged these with distress ink.


I punched out a door knob fromf gold card which I also used to create a background layer


After assembling the card I mounted it to black card.


Thanks so much for visiting my blog and checking out my latest Christmas tag.  I hope you have been enjoying them.
Have an awesome and artful day!

Tag # 6-25 "Merry Christmas" #onelittletag


Hello my friends!  Thank you for joining me.  I an still playing catch-up on my Christmas tags.  This is my tag for June.  I  started off with an ivory coloured cardstock.  I sponged on some antique linen distress ink to "age" the card, then I used the same ink to stamp on some music notes with a Heidi Swapp stamp.
I sponged some gold ink through a Tim Holtz stencil in a random way to add some interest to the background.  I kept the background fairly light so it wouldn't be too busy with the patterned balls   i used a metallic marker to draw in the "string".  I tore and distressed the edgs of the background  I have been using items from my (vast) stash to make my cards.


When I initially created these Christmas bulbs, Which were die cut using a Sizzix die, I pressed the tops of them into some versamark ink and some silver embossing powder to create the caps.  I edged the bulbs with distress ink.


I used some patterned Christmas stock from my stash to add another layer.  I assembled my tag and added some gold cord bows to the to of the Christmas balls.  I mounted the tag to black card to finish it off.

Thanks so much for visiting my blog and letting me share my tag with you.   Maybe some of you will be inspired to get a head start on your seasonal cards.  As much as I enjoy making Christmas cards, I always seem to be doing them at the last minute, or not getting them out at all.  So I will be happy to have several tags ready to go!

Friday 26 August 2016

Tag# 7-25 "Peace" #onelittletag


Hello my friends!  As I mentioned in my last post, I am playing catch-up on my Christmas tags.  This is my tag for July 25th.  Again, I used used die cuts from my stash.  I created a blended distress inked background and used gold ink and a JustRite stamp for the snowy starry sky.
Thanks for visiting my blog.  I hope you enjoyed this Christmas tag.  If you di, stay tuned for a few more in the next few days.
Have an awesome and artfl day!

Tag # 8-25 "Joy to the World" #onelittletag


Hello my friends!
My intention when I started the tag challenge was to do a Christmas tag for the 25th of each month.  As I have fallen behind on my tags, I have fallen behind on my Christmas tags.   I am not worried about catching up all the tags I have missed, but I do want to catch up on the Christmas tags.  I will be grateful to have them in a few months!  I also enjoy making Christmas tags and cards.  So my next few tags will be Christmas themed.  I have quite a stash Christmas die cuts that I have accumulated  over time.  I used a Taylored Expressions embossing folder to create the snow-falling background.  The festive man was from a Tim Holtz die, as was the sentiment.  I believe the swirling snow is a Memory Box die.  I created a distress inked background before adhering the die cut pieces from my stash.
Thanks for taking the time to visit my blog, I hope you enjoyed my Christmas tag.

Tuesday 23 August 2016

Tag# 8-23 "The Sky's the Limit" #onelittletag


Hello!  Thanks for stopping by.  I am still in a tag making mood, so today I have another tag to share.
I used a distress ink background.  I cut out a cloud shape from some copy paper and used it as a mask to create my sky background.


I used a Deep Red stamp for the "flying machine", an Andy Skinner stamp for the birds and a stamp that I got at Michaels that came with a stencil, I believe it is Recollections.
Before creating the clouds, I first lightly stamped the image in distress ink so I could see where it would be.  Before re-stamping the image in black, I used some metallic markers to olour in some of the gears, some other areas  and the propeller .   Then I over stamped with black versafine ink.  I used my stamp positioner to do this.  I stamped the birds and the sentiment.  I also stamped another image.  I coloured in the bottom  boat looking section of the the machine with distress ink, and the propeller with the silver marker.  I cut both of these out and adhered them to the image to give it some dimension.  Unfortunately, it's difficult to see the dimension in the photo. 


Thank you for taking the time to have a look at my tag!
Have an awesome and artful day!


Monday 22 August 2016

Tag# 8-22 "Delightful" #onelittletag


Hello again my friends.  This is the other tag that I made tonight Another fairly simple tag with a distress ink background.  I stamped the background with a Hero Arts stamp (one of my favourites!) wising bronze ink.  I stamped my focal image, another Hero Arts stamp, using my stamp positioner.  I used black versafine ink and Blueprint sketch distress ink.  I stamped my Fiskars sentiment with the black ink, added an embellishment from my stash and mounted to a black card to finish it off.


Thanks again for having a look at my tag.
Just a couple of short posts today, but I hope you enjoyed them.
Have an awesome and artful day!

Tag 8-21 "Angel" #onelittletag


Hello my friends!  I was in a tag making mood tonight, and made a couple of tags.  They are fairly simple, using some stamps for the first time and some embellishments from my stash.  I used distress ink for this background and a Tim Holtz stencil.  I was happy to use the Carabelle Studio stamp for the first time.  I used a stamp positioner that I made to first stamp with black versafine ink and go over it in certain areas with my gold ink.  To finish it off, I punched the corners with a Fiskars punch, added some embellishing pearls and mounted it to black card.


Thanks so much for stopping by and letting me share my latest creations with you.
Have an awesome and artful day!


Tuesday 16 August 2016

Another fun alcohol ink class with Margaret!


Hello my friends!
Monday night was another night of alcohol ink play!  My friend,  Margaret Brackley, gave another awesome class, enjoyed by all!  Some were new to the class and a couple enjoyed the last class so much, they wanted to do it again.  This was a shorter evening class, but everyone still came out with beautiful tiles and gorgeous pendants (that, unfortunately, I didn't get photos of!).  I know there will be several people returning to the upcoming full day/ Saturday class, which will be at the end of October or the beginning of November.  There will be some new projects, just in time for Christmas.  And, of coarse, pendants!
The class was a lot of fun, please enjoy the photos and have a look at some of the beautiful and vibrant work.  It's hard to find a medium as vibrant as alcohol ink!


Thank you so much for stopping by and letting me share our fun evening with you!